Many of us have way more t-shirts than we will probably ever get to wear. I know I do. Shirts people have given me, shirts I bought because it had a nice design/fabric and shirts from events I have attended. At this point, I probably have over 20 t-shirts in my drawer but only a handful get worn. It's not that I don't like all the shirts it's just that I tend to pull from the top of the stack every time. This means, whatever I wore, laundered and put away last will get pulled out again.
If, for whatever reason, you do not have extra t-shirts, or you just can't put the scissors to them, you could do this with any shirt that is not too stretchy. Fabrics with a lot of stretch will not hold up well for a tote bag, unless you line it with non-stretchy fabric. (This article does not cover how to line a bag...that will be for another day.)
So, on to the fun...
Tools and materials you will need
Steps
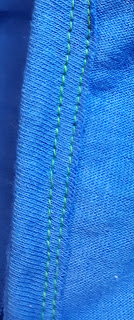
Marking and Cutting

Be sure to leave the sleeve seams on the part that will be the bag.


Mark the cut line 1/2" from seam. Cut where marked.

Finishing cut seams
- A single fold will leave the raw edges showing on the inside but the bag would be perfectly usable. (I've done this method when I just wanted a bag for shopping and do not need it to be show ready.)
After sewing the edge, clip close to the seam for a more finished look.
- A double fold will give you a more finished look. If it is difficult for you to get the material to double fold, you could single fold, sew and then repeat.

- You could also use binding tape (or other fabric) to give the edge a clean look. This method may also give more stability to the bag opening. T-shirts tend to be stretchy and a binding tape will prevent the opening from stretching at all.
- A regular straight stitch is what is most commonly used, but there are various stitches on even the most basic sewing machines that could be used to give the edges a different look also.

Finishing the collar area (bag opening)


Finishing the sleeve area (handle opening)
You can choose any of the finishing methods you would like for these openings. Since the openings are not as big as the collar area, I chose not to use the binding tape. Instead I did one side as the single fold and the other as the double fold - basically, so I would have pictures for this page! 😄

Adding optional pocket(s)
- Before adding pockets, it is best to decide how long the bag should be, so you know the correct placement of the pocket(s). If you are shortening the bag, and decide to cut the extra off now, be sure to leave an extra inch beyond the finished length.
- with the sleeve folded in half - with underarm seam on right - you can see the material slopes quite a bit. I marked and cut about 2 1/2 - 3 inches from the seam on the right. (I will be using the material on the left.)

- Material from both sleeves were trimmed to roughly squared when folded in half. (In the below picture, the left of each piece is the fold and the right side is where I just cut them.)

- These 2 pieces will be sewn together to form a larger pocket front. When sewing these together, put the hemmed sides to the top and bottom. (These hems are from the original sleeve.)

- Pin and sew these 2 pieces together.

- Trim the fabric close to the seam

- Top stitch so both pieces of the seam are facing same way.

- Pin pocket in place. Fold left and right sides under. (I find about a 1/2 folded under works well.)

- Sew around the pocket, leaving top open. I like to sew 2 lines around for extra holding power, but this is your option.

Closing the bottom up
- with sides of t-shirt meeting in the middle. This would put the handled in the middle of the front and back instead of at the sides.
- straight across, side seam to side seam - this is the way I have chose for this bag.
- Draw the line all the way across the bottom of the bag. You could just sew this line all the way across and have a flat bag, or you could follow the next steps to square up the corners of the bag.

- To square up the bottom sides, draw the boxes as shown in the picture above - one on each side of the bag just on top of the lower sew line mark.
- I used 2" square for this bag. This will make the sides of the bag just about 2" wide.
- Sew the bottom seam between the boxes....do not sew the bottom line of the box. (If you do, it doesn't really matter as it will be cut off anyway.)

- Cut the box out...just outside of the drawn line

- Fold the corner seam...middle of the side matching the bottom seam.


- turn bag right side out and sew the corners down again. This step adds more strength to the corners.


TADA!!!


Yup! That pocket is crooked as a three dollar bill! But it's still good for getting the groceries home.


No comments:
Post a Comment